Showing posts with label Beer. Show all posts

Wednesday, January 3, 2018

Hobby sabbaticals

This past month I brewed my 50th batch of homebrew and called it a good run.

Once more, into the brew
It was not the first time I let go of a hobby. When I was deployed to Iraq and then Afghanistan I took up fly tying. 

First Iraqi Fly

Just as it was satisfying to drink a beer I had brewed it was fun to catch a fish on a fly that I tied. While both were fun at some level I realized that there are some good lessons in letting go of hobbies.

Testing it

Sweet carp success

You Only Save Money If You Enjoy the Time

It’s possible to save money by tying your own flies or brewing your own beer – but only if you make that your focus. It’s tempting to do some easy math and think that you save money on beer. For example, even with doing partial extract brewing where I buy a lot of liquid malt extract (the most expensive ingredient) I can brew 5 gallons of beer for around $56.


An 5-gallon keg of decent craft beers are averaging $70 so for a while I convinced myself that I was at least making money. However, I soon realized that this calculus neglected the 4 - 5 hours to brew and 1 - 2 hours it was taking me to bottle the beers.

And once I had kids time for hobbies came at a premium. While homebrewing was fun, I realized I would often rather be running or catching up with the kids and house projects.

Keep Fun Time Fun

It also started to feel like a chore to bottle the beer. I could have bought a kegging set-up and gear. But this felt like throwing more money after something that I was questioning. For some people brewing is a creative outlet to try really weird flavor or to make really world-class beer. I was brewing good beer but beer that I could buy in a store and that seemed questionable.

Decluttering

Finally, it takes mental space to maintain gear for brewing. Since I was down to brewing once or twice a year I would often find that some key piece of gear had broken the previous time and I hadn't replaced it. Or the kids had walked off with it. Our house had not missed the gear yet.

So long and thanks for the beer.

We'll Call It a Sabbatical

There was still a part of me that held on for a year or so after I thought about retiring. I feel the sunk cost of the equipment and time getting my experience. But at 50 batches of beer I can at least say I gave it a good run.

At the moment, I am phrasing it as a sabbatical from brewing. I still enjoyed it and might someday return to it when the kids are older or gone. Just like I might one day tie my own flies again. But for now I will focus on other priorities.

Someone's ready to brew.

Sunday, October 12, 2014

One Last Time into the Mountains

Fraser and Winter Park in the early fall with the Hermansens

Before I left for Kuwait, I got a four-day pass. Rather than go home and say goodbye again and do house chores, Alita and I decided to go to a third space. We did not want to spend most of our precious time driving, so we opted to check out Fraser and Winter Park (Outside of ski season, it’s a little under 2 hours from Boulder or Denver).

Like most towns off of this stretch of I-70, Fraser and Winter Park are more popular as winter destinations (and after than probably summer destinations). Without really planning to, we have found these and similar towns to be fun to visit in the quieter fall.

Hiking, Camping and Fishing

With the logistics of a baby and a 4-day pass, we only managed one of the three. However, we were really pleased to find that in addition to the stunning vista afforded by more rigorous hikes, the area has quite a few hikes that are friendly to those carrying kids (and someday soon enough, slightly more mobile ones). The Winter Park & Fraser Chamber ofCommerce website was the best resource that we (Alita) found. There you can find two pdfs: one of descriptions of good day hikes and a second rough map of the trail system. I say rough map because the trail lines are pretty thick and some of the trailhead locations seem approximate to me.

Vasquez Nature Path

One-way distance: 0.65 miles
Trailhead: 39.901846°, -105.804645°
Elevation gain / loss (south to north): 60 ft, 160 ft


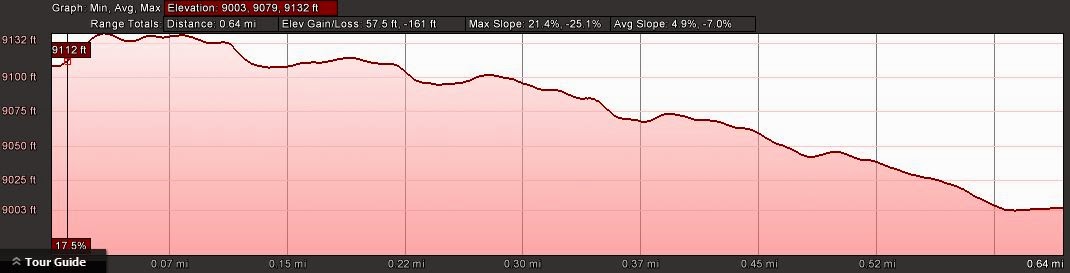
South to North Elevation Profile
While we accessed this trail from the Twin Bridges Trail, it also terminates at a road that can be easily reached and appeared to have parking. While there are a few boulders here and there, the trail is pretty smooth walking.

Bella clears the path of dangerous animals
Vasquez Creek is a small affair but with the path never far from the stream it would be perfect for a future family trip where I might only have an hour or two to fish. It has a few nice shoots and pockets of water that look perfect for doing two to three drifts and moving on.

Alita adds to the beauty of some already good-looking pocket water
Nice little pool on Vasquez Creek
The trail also had what appeared to be two campsites. While I am not sure how official these are, they did look like rather pleasant (and free?) places to stake a tent.

Nice creek-side campsite

Twin Bridges

One-way distance: 0.5 miles
Trailhead: 39.908388°,-105.799972°
Elevation gain /loss (west to east): 150 ft both ways


West to East Elevation Profile
There is space for about three cars about 150 ft past the trailhead. The trail goes down quickly and with some loose gravel, but is not hard walking. The first of the twin bridges comes as the trail crosses Vasquez Creek. Then there is some nice easy walking – although we did go by some curious wood piles and a clearcut.

Some odd little wood piles

Easy walking on the Twin Bridges Trail
The Twin Bridges trail basically ends at the second bridge over Little Vasquez Creek.

Knud Peter checks out Little Vasquez Creek

Discovery, Challenger and Jim Creek Trail

Trailhead: 39.881942°,-105.754783°
Discovery and Challenger Trail Loop: 1.25 miles, 320 ft of gain
Jim Creek Cut-off: 39.881889°,-105.745369°
Jim Creek Trail: 1.9 miles, 840 ft of gain


Counterclockwise Elevation Profile of Discovery - Challenger Trail Loop
Jim Creek Elevation Profile (from the Discovery Trail cut-off)
The Discovery Center features lots of boardwalk and flat wide paths. The trail is shaded for most of the way but also features so great view of the valley. According to the sign at the entrance there is also fishing a short ways off the far side of the Challenger Trail (39.883104°,-105.745955°).

Bella inspects the boardwalk for safety
Wide paths of the Discovery and Challenger Trails
Getting water across the divide to the thirsty front range
We got about a mile (or just under halfway) up the Jim Creek Trail. We did not make it to the meadows which the Winter Park / Fraser Chamber of Commerce touted to have excellent views; we did still get some great view of the other side of the valley which was just beginning to show some fall colors.

Fall colors from Jim Creek. Little man laments that he cannot see them.

Fraser – Winter Park Trail

This bike path parallels Route 40 between Fraser and Winter Park. It would be great if you wanted to use bike transportation, but we skipped it since there were so many great options that got away from the highway.

Eateries and Breweries

Hideway Park Brewery

This place is a new (June 2014) nano-brewery right the Route 40 downtown of Winter Park. True to its nano designation, space is tight and I suspect it will be standing room only come ski season. But in the shoulder season we were able to belly right up to the bar.


The day we showed up they had six offerings on tap – two IPAs (one wet hopped with Colorado hops), two reds, a rye stout and a golden ale. The rye worked really well in the stout – I like it better than I have liked rye in other styles. The Bru Brew IPA was both Alita’s and my favorite although the Pocket Rocket Red was a close second for me. Overall though it was a solid line-up. No food, but they had some popcorn with a fun selection of spices to throw on them.

Looking good

Elevation Pizza

The strip-mall like location of this pizzeria did not set my expectations too high, but I left realizing that Alita had found a great place to pick up a pizza to take back to the cabin. They have pretty good specials for each day of the week, so check it out when you go in or ask when you call. I ended up getting a half-and-half of the Adam Bomb (green chilis, pepperonis and cream cheese) and the Ranger (pesto sauce, spinach, garlic and chicken). Both were amazing even without the days hiking under the belt.

Smokin’ Yards BBQ (Idaho Springs)

While not in Winter Park or Fraser, this was a nice halfway point between our start and our destination that had come highly recommended. If you pass by around a meal time it's worth a stop. You can get to it easily from the first Idaho Springs exit as you head west. The outdoor seating afforded some great views of Clear Creek. We both tried the Carolina Pulled Pork which was a wise choice. 


Thursday, April 10, 2014

First All-Grain Batch with a Two Bucket Mash-Tun

Making the plunge

I have been meaning to brew an all-grain beer for a while but I just never got around to it. Finally, necessity, that great “mother of invention”, forced me into this process that I had been meaning to do for a while but never quite had the motivation to do.

I generally brew extract beers – and probably will again. Extract brewing cuts about an hour out of the brew day by out-sourcing the extraction of sugars from the grains. This means that I can generally brew an extract beer in a little over three hours (from the time I start getting out my supplies to when the kitchen is clean).

While there are other reasons for getting into all-grain brewing, I liked the idea of just being that much more involved in the process and the cost. Extract is typically the most expensive line item in any beer I brew – generally about 40-50% of the cost. Starting from just the grains offered a way to tackle this cost and add some fun to the process.

 As I hinted, I went to the homebrew store meaning to brew another extract batch. However, the store I went to was out of liquid AND dry light malt extract. I have not been a fan of this store for a while, but this might seal the deal. These two malt extract are foundational to extract brewing. It would be like a Mexican restaurant and running out of tacos and tortillas. (Next time I will be checking out this new homebrew store in Boulder) Incidentally, they were also out of both of the (popular) hop varieties that I needed.
 
More grain than I've ever brought into the house
Making the all-grain set-up

I was leaving for two weeks and my home will soon be getting a little warm for fermentation – I felt it was now or never. So, in a game-time decision, I got the right amount of base grains instead. And a 5 gallon bucket. In his book, The Complete Joy of Homebrewing, Charlie Papazian (the godfather of homebrewing) suggests a quick and dirty way of getting in to all-grain with plastic buckets.

The issue is that after you have extracted the sugars you need to strain the liquid out of the grains. There are many set-ups for doing this, but for me they broke down into purchasing a set-up or investing some time in making your own with some pipes and a cooler. I did not have time to make a nice set-up or wait for something reasonably priced to show up on Cragslist.


Charlie’s method drilling some holes in the bottom of one bucket and placing this into another bucket with a spigot. A quick internet search said that a 1/8 inch drill bit would do the trick. It took me about an hour to cover the bottom of the non-spigot bucket with holes.


Next Time

Overall though the process seemed to work. I got wort out of the grains and things seemed to be fermenting by the time I had to leave for two weeks. Of course, the proof will come in another two to three weeks. As expected, there were some learning points – especially since I decided to jump with a little less prep that I would have liked.

Stirring the Grains for the second batch sparge

I ended up using about 15 pounds of grain. If I were to do it again, I would probably start with a “smaller” beer. But I wanted an imperial red, damn it. The problem with using so much grain in this set-up was that it was hard to mix the water and grain with a plastic spoon. It was made for brewing but it still bent a lot especially as it warmed up in the grains and water. This was not a problem for the initial batch of the batch sparge – I put in a little grain and water, mixed it, and then put in more grains and water. But when I did my second batch of my sparge it was hard to mix the grains. I could either get a stronger spoon (wooden paddle) or take the grains out. The first method is not guaranteed to work and the second sounds messy. I think I will eventually just go to a cooler and pipes whenI have time.

Insulation

I also put a towel around the set-up to keep in some of the heat. The temperature at which the grains and water are at is important because the process relies on enzymes in the malt. These enzymes like a particular temperature range. I think this set-up lost a little more heat that I would have liked. I might need to find some better insulation for next time.


Boil-off

The two pot set-up worked pretty well – but I lost a lot more to boil-off than I would have liked. I may switch to a less vigorous boil next time – especially after reading this article about induction heating which made it seem like the vigor of the boil was not as important as I had initially been led to believe.
 
Double pots in the background
Dead-space

I completely forgot about the dead space in the bottom of the mash-tun vessel. With the two bucket set-up this was significant (probably a little over a gallon). I was rather sad when I when to get rid of my grains and found these precious sugars just hanging out instead of boiling away with their friends. Unfortunately, at this point it was a little late to add it so this beer will not be as “imperial: as I had hoped.


Oh well. I will relax, not worry and have a homebrew. It will still be beer.


Saturday, March 29, 2014

Das Alt Bier

Brew Day – Sun. 25 Jan. 2014

With the new kiddo, brewing time has become a precious commodity. It seemed appropriate then to share this brew day with a friend of mine whose first child was due in less than two months. I made up a starter the day before with WLP 036 German Alt Yeast.

I used the recipe "Alt.Beer.Recipe" from the book Brewing Classic Styles by Jamil Zainasheff and John Palmer. The homebrew shop in Boulder was out of pilsner malt extract and so I ended up going with 100% munich malt extract instead – I figured  it would still be beer.

Getting ready to make the starter
 Recipe

OG: 1.050 (12 .3 op) – Actual: 1.060 (oops)
FG: 1.014 (3.5 op) – Actual: 1.016 (better)
IBU: 32
Color: 16 SRM (31 EBC)
Alcohol: 4.7% ABV (3.7% ABW)

Boil: 60 minutes
Pre-Boil Volume: 7 gal lons (26.5L)
Pre-Boil Gravity: 1.042 (10.5 op)

Extract
Pilsener LME (2.3 °L) 7.4 lbs. (3.35kg) 
Munich LME (9 °L) 0.7 lb. (318g) Actual: 8.5 lbs

Steeping Grains
Carafa Special II ( 430 °L) 0.25 lb. (113g)
CaraMunich (60 °L) 0.25 lb. (113g)
Pale Chocolate Malt (200 °L) 3.0 oz. (85g)

Hops
Magnum 13.0% AA for 60 min. 0.6 oz. (17g)

Dan, my co-brewer for the day, was an excellent assistant. With his help we did the brew day in a little over 3 hours. I once again did a full wort boil staggered over two pots. The pots were staged 15 minutes apart with half of the ingredients (approximately) put into both. The singe hop addition made things very easy and the wort was easy to transfer to the fermenter.

Clean-up complete
One hurdle that we had to overcome for fermentation was that the homebrew shop was also out of one inch tubing (I was beginning to notice a theme with this homebrew shop). Initially I tried to put a smaller (3/8th inch, I believe) hose on the top with the airlock. This tube kept getting blown off. Then I realized that I had a large half-inch auto-syphon tube. This seems to stay on a lot better (although a one-inch tube would have been better).
 
This fermentation stretched the capacity of my airlock and blow-off tube
Bottling – Wed. 19 Mar. 2014
I did not have time to bottle this one after a month so instead I transferred it to a secondary fermenter  on 23 Feb. I have felt that I bottled my last few beers too early and so I felt that giving it a few extra weeks in the fermenter would be a good idea. And I did not have time to bottle.

Racking from the fermenter into the bottling bucket
 So finally, almost two months after brew day, I bottled the beer. The process took about two hours. I got 48 bottles. Ingredients were $41.12. So this one came to 85 cents a beer. Not bad.

Moment of Truth


While I like to wait two weeks, that is not always an option. So after a little over a week I tried the first beer on the 27th. It came out dark reddish brown and clear. Reasonable carbonation for a week. As expected, it was nicly malty with just a bit of caramel / chocolate in the background. I have no idea if it ended up in the alt beer category, but it’s a good beer so far.

Das Alt Bier

Wednesday, February 19, 2014

Stout Month 2014

Every February the Mountain Sun and its satellite brewpubs have Stout Month. For those of us who like the black gold, this is a bright light during the dark days of winter. I am fortunate enough to live within a 10-minute walk of the Southern Sun (one of those satellites). This lets my wife and I eat a nice dinner at home and go over just for a brew.
 
Valentine's Day toast at Under the Sun
Bringing our new son along has actually been a lot of fun. In Boulder you are not out-of-place when you bring a kid to a brewpub. At one point, when my wife and I were waiting for a table, one of the nearby patrons remarked to her friend that this place was virtually a nursery with all of the toddlers walking around.
 
Family photo at Southern Sun
This year my wife came up with the brilliant idea of Stout Month Bingo. If you frequent one of the Suns during this month, print this out for some fun while you sip your stout and eat free fries while waiting for your table. We are still trying to fill in one or two more squares – suggestions welcome.

Need ideas for three more squares
 And finally, here are some of my personal favorites from this year:

Chocolate Dip Stout: This one came out great this year. On nitro its like a chocolate milkshake and a beer had a child.
Girl Scout Stout: A perennial favorite. A perfect balance of roast & mint.
Stoked Oak: Great mix of chocolate, roast and oaky vanilla. You get the oak with out the higher alcohol from some barrel-aged beers.
Nihilist: My favorite of their imperial beers. Followed by the oatamis prime and the megatron.
Coconut Stout: Nice subtle coconut flavor. Smooth velvety chocolate with light roast in the background. Kinda refreshing aftertaste.

Friends sharing stouts early on in the month


Saturday, February 1, 2014

Searching for Fame and Glory – Sea Salt Caramel Stout and Stout Month 2014

I largely brew for my own enjoyment. I also just do not take the time to plan my brewing around homebrewing contests. But my wife, who is not a fan of stouts, suggested that I make a sea salt caramel stout for Stout Month this year. She even went online a looked up a couple of recipes. She is a keeper.

StoutMonth is the glorious month of February when the Mountain Sun breweries put out about a dozen taps per day of the black gold (which rotate virtually every day). Past winners have included an oaked stout and one that tastes like a Girl Scout thin mint cookie (it's good). While a sea salt caramel stout is brewed by a few places, I thought it was intriguing enough that it might have a chance. Game on.

Countdown on the window of Under the Sun
For the ingredients, I combined an errand to pick up a Bob stroller in Longmont with a chance to check out a different homebrew shop - The Bald Brewer. The guy was really cool and we had a good conversation as I went around getting my ingredients. I adapted the recipe off of one that I found on BrewToad. I picked up some caramels from King Soopers and went back home to make the starter.

The Yeast Starter – Sat. 19 Oct.

For yeast I went with the White Labs WLP 002 – Engish Ale Yeast. The flavor from this yeast turned out great, although like Engish Ale yeasts it did settle out rather quickly. If I had it to do over again I would have roused the yeast after about a week of primary fermentation. The starter followed my usual procedure of 100 g of DME boiled in a liter of water for 12 minutes.

Brew Day – Sun. 20 Oct.

I mostly followed the online recipe. I did a full wort boil (all 5 gallons) spread out over two pots that I staggered by 15 minutes. I split the specialty grains, hops, sea salt and caramel equally (roughly) between both pots. Given that a stout does not have that many hop additions this worked well and was not too much trouble.
 
Pot on the left: malt extract added, pot: steeping the specialty grains
I made a few small modifications to the recipe – I cut out about half of the lactose. I did not want a cloyingly sweet beer. I also threw in a whole oz of perle (instead of the 1/2 oz. called for) because, well, what am I going to do with an extra half ounce of hops? I put the caramels and sea salt in with about 15 minutes to go.


Fermentation started pretty quickly and went strong for about a day and a half before calming down a bit.


Bottling – Mon. 4 Nov.

I gave this one a little over two weeks – which was probably a mistake. My reasoning was that my wife was about a month out from our due date and I wanted to make sure this was bottled in time for the stout month entry date on 4 Jan.


Other logistical notes

The brew day started at 5:55 and was wrapped up by 9 pm – a little over 3 hours. Bottling took around 2 hours. The starter took around 30 minutes. Total time was around 6 hours.  Total costs were $52.78 plus probably a dollar or two for the caramels (I already had the salt). We will just call the total costs around $55. I got about 48 bottles out of the deal for a price of around $1.15 a brew.

Epilogue

The beer turned out really good. As my Boulder friends will be sad to see, it did not win – but there are some good homebrewers here, so I feel it’s like saying “I didn’t win the Bolder Boulder” – people understand that you can still have done well.


After about a month some of the bottles turned out a little overcarbonated. If I did this one again I would give it another month or so in a second carboy. I do not have precise temperature control at the house and so I think it may have just needed more fermentation time (It has been a cooler winter). It is also possible that rousing the yeast could have helped. Oh well, I may just have to brew it again.

Monday, January 27, 2014

Wildwood and Gravity Brewing Company

25-26 Jan. 2014

It is hard to keep up with new breweries in Boulder County – but that does not mean one should not to try. This weekend Alita and I checked out Wildwood Brewery and I wandered over to Gravity Brewing.


Alita got me a Groupon for this brewery for Christmas and we decided it was time to cash it. Wildwoods is located in east Boulder on Arapaho near Avery. The brewery is in a warehouse space and it’s a tasting room only. But it has space for a meal if you want to bring one.They have six beers in their regular line-up. The Groupon was for a sampler of these beers.

Alita shows off the Wildwoods line-up
My favorite was their Treeline IPA. I would call it an English-style IPA. It has a nice piney hop aroma and flavor with a balance and flavor that reminded me of an imperial IPA. Their Campfire Red was also very interesting. As the name could suggest – they put a subtle bit of smoke into the usual malty flavor. The Berry Patch Wheat was also really interesting. I am generally not a fan of fruit beers since they often come out cloying, but this one has the fruit flavor without the overbearing sweetness. The rest of the line-up was also really solid. I would go back to this place.
 
Toasting little man's second brewery

This place had been on my radar for a while, but I had not found a good excuse to check it out. Putnam Smith, a folk musician from my home state of Maine, provided just such an excuse. Gavity's tasting room was a nice low-ceiling-but-open venue - perfect for some good folk music on a snowy winter's day.

Since it was winter I did not check out their beer garden – so a return visit may be needed. But the interior was spacious with a really nice bar design.

Photo from the Gravity website
As the name would imply their beers have some heft to them. Since I was driving I opted for a few of their 4-oz (maybe 3 oz) samplers. At $5 for three, it was a pretty good deal for high gravity beers - and about the right amount if you need to do something after. 

I tried the Jubelium Peppercorn Belgium Ale. As the name promised it has a just a bit of peppercorn in the light Belgium funk – a surprisingly good combination. Also worthy was the Ebb & Flow – Double Red Rye and the Tsar Bomba Russian Imperial Stout. My favorite sample of the night through was the Bourbon Barrel Aged Acceleration – Double India Pale Ale. Think Maharaja with a little oak. Amazing.