Saturday, April 12, 2014

Running on Cheese Curds


Running Options in Fort McCoy, WI

Running is always a great way to get to know an area and Ft. McCoy is a small enough post that if you are there for a week or two you can get to know the area pretty well. I have been blessed with a couple of these opportunities. While Ft. Hunter-Ligget remains my favorite post for running, there are some fun trails on Ft. McCoy if you want to get away from the military convoys (and some less-traveled roads). This is almost becoming a series that could be called “where to run if you find yourself at various Army posts”.

If you bother to coordinate with range control you can probably run some of the dirt roads in the training areas, but I was stuck on post.

Research

Since this is, to the best of my knowledge, the only blog or web-source that addresses the neglected topic of running on Army posts, I turned to Google Earth. I did not  have to look too far – I spotted some overgrown dirt paths branching out from the very building where I was staying. Even in wooden areas the straight lines of man-made paths and old roads show up pretty quickly. Once you find one path, it is usually pretty easy to find others (which cannot be seen from satellite imagery) once you are on the ground.

Promising trail to try
On-Post Dirt Paths and Trails

The best network on on-post trails is in the southeast corner of post. If you are just looking to run two to four miles, you could do it almost entirely off road and traffic-free. Just park near buildings 50 / 51 (off the lower end of South O Street). From here you can snake back-and forth to get in some running on grass, dirt and sand. You will often stir up a half-dozen deer or more.

Main trail network on the SE Corner of Post
 There are some other isolate short sections. There is one dirt loop on the west post and one to the west of the on-post lodging (Building 51)

Dirt loop on the west side of post
Round the Post

Most loops around the post will get you six to eight miles. Below are some of my go-to routes:

The Y Loop – takes you through the center of post.


Outer Loop

And finally, for the occasional speedwork (or APFT), there is a half-mile track on E Eaton and O Street.


Other options

If I had my own rental car and a free morning or afternoon, I could also have gone over to Sparta (said as if you were going to make a stand against maniacal Persian hordes). Apparently this town in western Wisconsin is the “biking capital of America” (mysteriously beating out Portland, Boulder, Minneapolis, etc.). With that said, it does appear to have an extensive rails-to-trails network that goes for miles and miles. While mostly pavement, it looks like a nice traffic free option for a long run.


Thursday, April 10, 2014

First All-Grain Batch with a Two Bucket Mash-Tun

Making the plunge

I have been meaning to brew an all-grain beer for a while but I just never got around to it. Finally, necessity, that great “mother of invention”, forced me into this process that I had been meaning to do for a while but never quite had the motivation to do.

I generally brew extract beers – and probably will again. Extract brewing cuts about an hour out of the brew day by out-sourcing the extraction of sugars from the grains. This means that I can generally brew an extract beer in a little over three hours (from the time I start getting out my supplies to when the kitchen is clean).

While there are other reasons for getting into all-grain brewing, I liked the idea of just being that much more involved in the process and the cost. Extract is typically the most expensive line item in any beer I brew – generally about 40-50% of the cost. Starting from just the grains offered a way to tackle this cost and add some fun to the process.

 As I hinted, I went to the homebrew store meaning to brew another extract batch. However, the store I went to was out of liquid AND dry light malt extract. I have not been a fan of this store for a while, but this might seal the deal. These two malt extract are foundational to extract brewing. It would be like a Mexican restaurant and running out of tacos and tortillas. (Next time I will be checking out this new homebrew store in Boulder) Incidentally, they were also out of both of the (popular) hop varieties that I needed.
 
More grain than I've ever brought into the house
Making the all-grain set-up

I was leaving for two weeks and my home will soon be getting a little warm for fermentation – I felt it was now or never. So, in a game-time decision, I got the right amount of base grains instead. And a 5 gallon bucket. In his book, The Complete Joy of Homebrewing, Charlie Papazian (the godfather of homebrewing) suggests a quick and dirty way of getting in to all-grain with plastic buckets.

The issue is that after you have extracted the sugars you need to strain the liquid out of the grains. There are many set-ups for doing this, but for me they broke down into purchasing a set-up or investing some time in making your own with some pipes and a cooler. I did not have time to make a nice set-up or wait for something reasonably priced to show up on Cragslist.


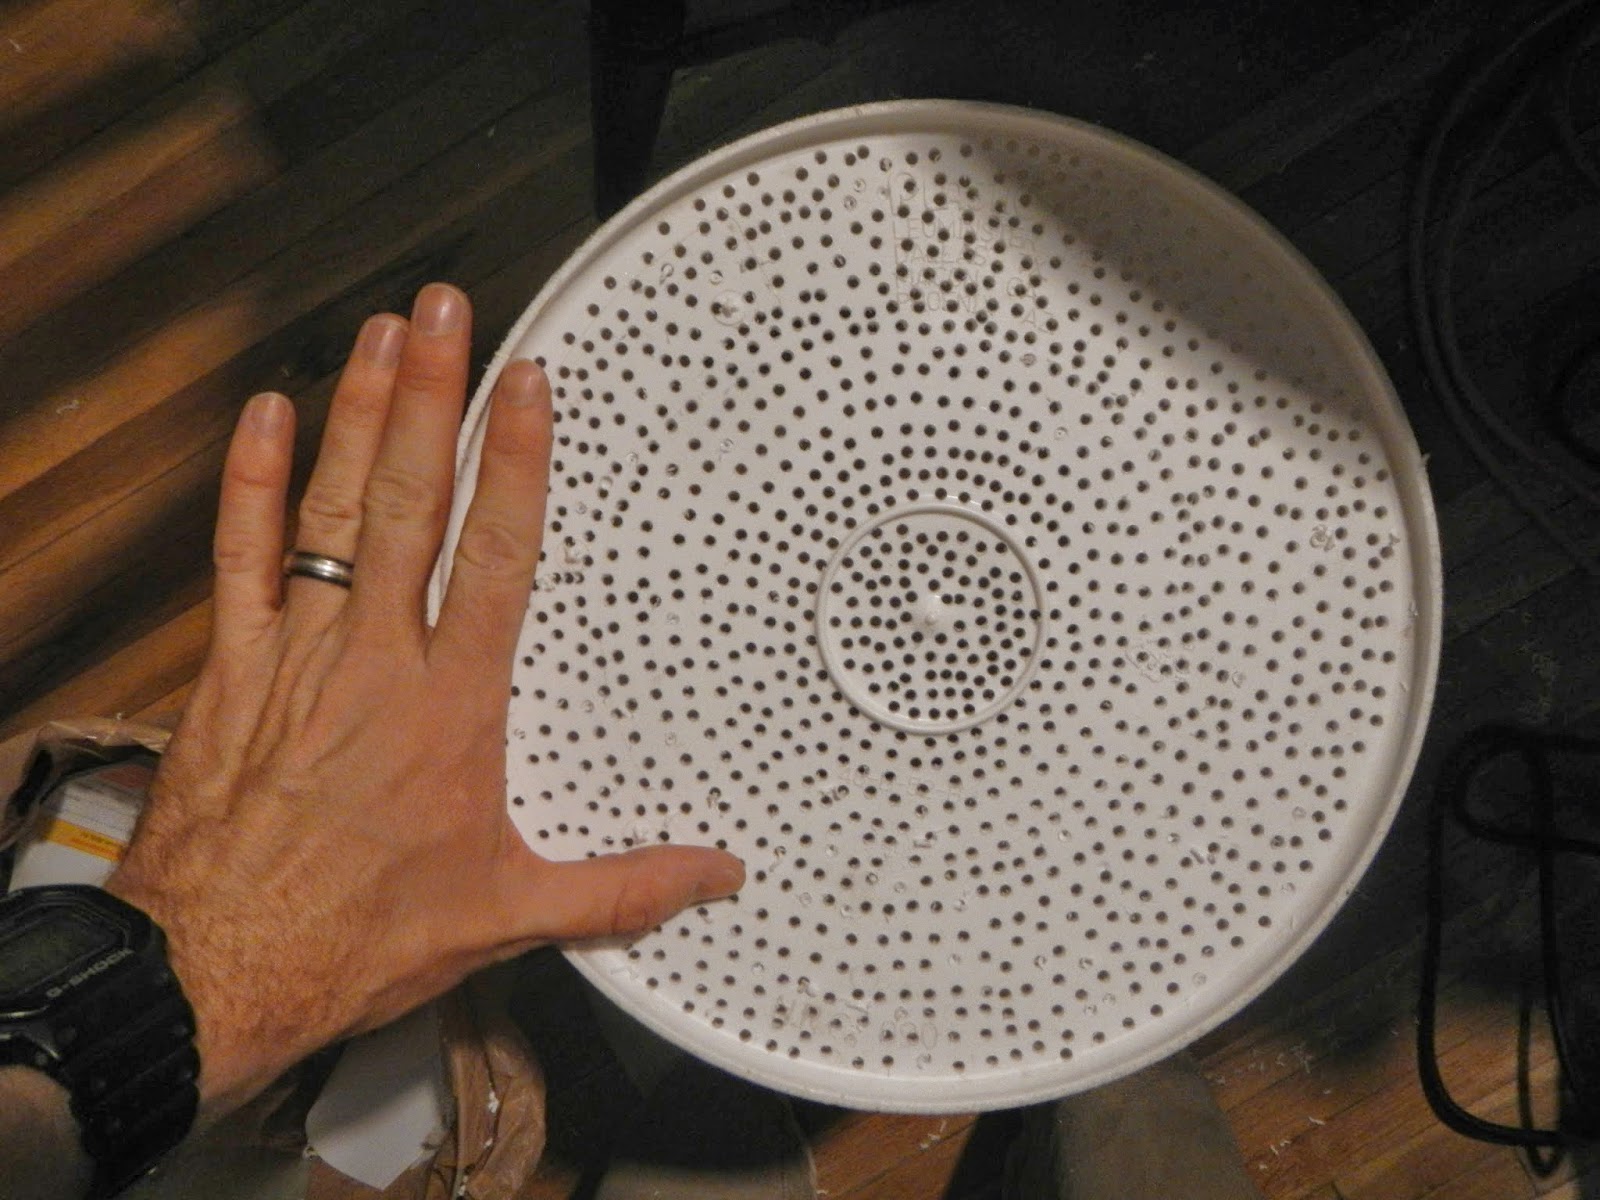
Charlie’s method drilling some holes in the bottom of one bucket and placing this into another bucket with a spigot. A quick internet search said that a 1/8 inch drill bit would do the trick. It took me about an hour to cover the bottom of the non-spigot bucket with holes.


Next Time

Overall though the process seemed to work. I got wort out of the grains and things seemed to be fermenting by the time I had to leave for two weeks. Of course, the proof will come in another two to three weeks. As expected, there were some learning points – especially since I decided to jump with a little less prep that I would have liked.

Stirring the Grains for the second batch sparge

I ended up using about 15 pounds of grain. If I were to do it again, I would probably start with a “smaller” beer. But I wanted an imperial red, damn it. The problem with using so much grain in this set-up was that it was hard to mix the water and grain with a plastic spoon. It was made for brewing but it still bent a lot especially as it warmed up in the grains and water. This was not a problem for the initial batch of the batch sparge – I put in a little grain and water, mixed it, and then put in more grains and water. But when I did my second batch of my sparge it was hard to mix the grains. I could either get a stronger spoon (wooden paddle) or take the grains out. The first method is not guaranteed to work and the second sounds messy. I think I will eventually just go to a cooler and pipes whenI have time.

Insulation

I also put a towel around the set-up to keep in some of the heat. The temperature at which the grains and water are at is important because the process relies on enzymes in the malt. These enzymes like a particular temperature range. I think this set-up lost a little more heat that I would have liked. I might need to find some better insulation for next time.


Boil-off

The two pot set-up worked pretty well – but I lost a lot more to boil-off than I would have liked. I may switch to a less vigorous boil next time – especially after reading this article about induction heating which made it seem like the vigor of the boil was not as important as I had initially been led to believe.
 
Double pots in the background
Dead-space

I completely forgot about the dead space in the bottom of the mash-tun vessel. With the two bucket set-up this was significant (probably a little over a gallon). I was rather sad when I when to get rid of my grains and found these precious sugars just hanging out instead of boiling away with their friends. Unfortunately, at this point it was a little late to add it so this beer will not be as “imperial: as I had hoped.


Oh well. I will relax, not worry and have a homebrew. It will still be beer.


Saturday, March 29, 2014

Das Alt Bier

Brew Day – Sun. 25 Jan. 2014

With the new kiddo, brewing time has become a precious commodity. It seemed appropriate then to share this brew day with a friend of mine whose first child was due in less than two months. I made up a starter the day before with WLP 036 German Alt Yeast.

I used the recipe "Alt.Beer.Recipe" from the book Brewing Classic Styles by Jamil Zainasheff and John Palmer. The homebrew shop in Boulder was out of pilsner malt extract and so I ended up going with 100% munich malt extract instead – I figured  it would still be beer.

Getting ready to make the starter
 Recipe

OG: 1.050 (12 .3 op) – Actual: 1.060 (oops)
FG: 1.014 (3.5 op) – Actual: 1.016 (better)
IBU: 32
Color: 16 SRM (31 EBC)
Alcohol: 4.7% ABV (3.7% ABW)

Boil: 60 minutes
Pre-Boil Volume: 7 gal lons (26.5L)
Pre-Boil Gravity: 1.042 (10.5 op)

Extract
Pilsener LME (2.3 °L) 7.4 lbs. (3.35kg) 
Munich LME (9 °L) 0.7 lb. (318g) Actual: 8.5 lbs

Steeping Grains
Carafa Special II ( 430 °L) 0.25 lb. (113g)
CaraMunich (60 °L) 0.25 lb. (113g)
Pale Chocolate Malt (200 °L) 3.0 oz. (85g)

Hops
Magnum 13.0% AA for 60 min. 0.6 oz. (17g)

Dan, my co-brewer for the day, was an excellent assistant. With his help we did the brew day in a little over 3 hours. I once again did a full wort boil staggered over two pots. The pots were staged 15 minutes apart with half of the ingredients (approximately) put into both. The singe hop addition made things very easy and the wort was easy to transfer to the fermenter.

Clean-up complete
One hurdle that we had to overcome for fermentation was that the homebrew shop was also out of one inch tubing (I was beginning to notice a theme with this homebrew shop). Initially I tried to put a smaller (3/8th inch, I believe) hose on the top with the airlock. This tube kept getting blown off. Then I realized that I had a large half-inch auto-syphon tube. This seems to stay on a lot better (although a one-inch tube would have been better).
 
This fermentation stretched the capacity of my airlock and blow-off tube
Bottling – Wed. 19 Mar. 2014
I did not have time to bottle this one after a month so instead I transferred it to a secondary fermenter  on 23 Feb. I have felt that I bottled my last few beers too early and so I felt that giving it a few extra weeks in the fermenter would be a good idea. And I did not have time to bottle.

Racking from the fermenter into the bottling bucket
 So finally, almost two months after brew day, I bottled the beer. The process took about two hours. I got 48 bottles. Ingredients were $41.12. So this one came to 85 cents a beer. Not bad.

Moment of Truth


While I like to wait two weeks, that is not always an option. So after a little over a week I tried the first beer on the 27th. It came out dark reddish brown and clear. Reasonable carbonation for a week. As expected, it was nicly malty with just a bit of caramel / chocolate in the background. I have no idea if it ended up in the alt beer category, but it’s a good beer so far.

Das Alt Bier

Wednesday, March 5, 2014

Trailing Running Near Ft. Carson

3 – 6 March 2014

I went down to Ft. Carson this week to take the combat lifesaver course. Since there was no organized physical training to do in the morning, I got to do my own. So I was very happy when, in my research I found that there was a state park right outside of the main gate to Ft. Carson: Cheyenne Mountain State Park. The website claimed it had 20 miles of trails. And it was less than a 10-minute drive from the barracks we were staying in. Game on.

Cheyenne Mountain from the Soaring Kestral Trail
Navigating the Park

I was pleased to see that the park’s trails were well marked with color coded signs about six inches off the ground. Since the trails are windy and numerous, this was useful for orienteering in a new place.


Equally useful were the park map signs with the “you are here arrows”.

Got a little snow this morning
General Conditions

The trails themselves were fairly non-technical. On a hot summer day this could be a rough pace to run as there is little shade on the lower sections. As you climb though you get into some nice scrub oak and pinion pine. While you do not actually climb Cheyenne Mountain in the park or any truly steep trails, you are generally going up or down the whole time.


The trails are sadly off limits to dogs, but not to mountain bikes. Fortunately, the dog was at home and I generally ran outside of the popular mountain biking times.

After running about 90% of the trails my favorites were:

Talon – a nice moderate climb with some nice loops in the shade with Talon North and South.
Cougar’s Shadow – Just technical enough to keep the bikes at bay and through some nice woods.
Blackmere Loop – Nice big winding loop through the woods.

Top of the Blackmer Trail
My runs

~6.5 miles, 1300 vertical

The first day on post our training got done around 4:30 in the afternoon. I rushed out to find the park and get in some miles before the sunlight died out. The sun was already setting behind the park’s namesake mountain when I arrived at the Limekin Grove Trailhead Lot (38.731398° -104.820775°).

The Talon trail starts off open, wide with a low grade. At the intersection with the Sundance trail the grade picked up. It started traversing more and getting into some nice scrub oak and pines. I did the South Talon trail and headed back down. When I hit the Sundance Trail again I went east to get back to the start.


~8 miles, 1400 vertical

Today I started from the vistor’s center (38.734966° -104.819361°). I started off with a semi-open loop of the Zook (Blue), Sundance (Red) and Turkey Trot Trails. Then I went up the Limekin Valley and came back down the Boulder Run trail. This was a nice single track trail that was a little more technical than the others I had done thus far.


~10 miles, 1600 vertical

The Couger's Shadow and upper Blackmer Loop trails run and wind through some of the prettier woods in the park. There was a light snow this morning. The upper portions of the Blackmer Trail and Couger's Shadow do some nice woodline contour traverses.


Tuesday, February 25, 2014

Frozen Foot 5k

Sun. 23 Feb. 2014
8:30 A.M.

As I noted a while back, racing has fallen back in my priorities this year. I am still training for a marathon in May, but I have cut back from racing once a month or more. So I was a little surprised when my wife told me that she signed me up for a 5k.

She did not entirely spring it on me, but it was surprising because I had not really been bugging her either. The race was the Frozen Foot 5k. It was attractive in that it was close and, for Boulder, reasonably priced at $25. It was a fundraiser for the CU triathlon team, which while not striving to cure a cute kid of illness is not a bad cause.

The race was close enough that I just ran there from the house as a warm-up. We had received a dusting of snow but the roads were pretty good and temps were in the high 30’s. 

The sign-up was in the CU field house and was well run. I picked up my packet and got my gloves. I am glad to see more races giving out things other than t-shirts since at this point I could wear a different race shirt every day for two or three months.


The race kicked off at 8:30 (ish). The course stays entirely on the University of Colorado’s campus. This means that it has to do some frequent snaking to fit everything in. There was a few icy patches where we had to tread cautiously, but the other 95% of the course was dry. Two runners with Altitude running shirts took the lead and never looked back. The chase pack amongst us did a decent job pushing each other. The course was well marked with white arrows and volunteers at all of the big turns.


I was left wondering about was the true length of the course. I finished in 16:57 (5:43, 5:46, 5:36) which would be amazing, except that my watch said the course was 2.97 mi. It is possible that I lost a few hundredths on some of the many turns that the course needed to take to stay within the confines of the campus. However, I entered suspecting that I was in 17:15 to 17:30 5k shape and the course being just a bit short would square with this assessment of my fitness. 

The race had about 50 people total. While the field was not large, it was decently deep. Another fun thing of this being Boulder was that the guy who place right ahead of me was 51. The person I placed right ahead of was 13. If you average them you get pretty close to my age of 33. (Fortunately, this is a shorty trend - it would be rather rough on everyone's egos to be beaten by a 90-year-old in a 5k).


This was a well-run and reasonably priced race that was close to home. I may try this one again. Many thanks to the CU triathlon team for putting this on.

Wednesday, February 19, 2014

Stout Month 2014

Every February the Mountain Sun and its satellite brewpubs have Stout Month. For those of us who like the black gold, this is a bright light during the dark days of winter. I am fortunate enough to live within a 10-minute walk of the Southern Sun (one of those satellites). This lets my wife and I eat a nice dinner at home and go over just for a brew.
 
Valentine's Day toast at Under the Sun
Bringing our new son along has actually been a lot of fun. In Boulder you are not out-of-place when you bring a kid to a brewpub. At one point, when my wife and I were waiting for a table, one of the nearby patrons remarked to her friend that this place was virtually a nursery with all of the toddlers walking around.
 
Family photo at Southern Sun
This year my wife came up with the brilliant idea of Stout Month Bingo. If you frequent one of the Suns during this month, print this out for some fun while you sip your stout and eat free fries while waiting for your table. We are still trying to fill in one or two more squares – suggestions welcome.

Need ideas for three more squares
 And finally, here are some of my personal favorites from this year:

Chocolate Dip Stout: This one came out great this year. On nitro its like a chocolate milkshake and a beer had a child.
Girl Scout Stout: A perennial favorite. A perfect balance of roast & mint.
Stoked Oak: Great mix of chocolate, roast and oaky vanilla. You get the oak with out the higher alcohol from some barrel-aged beers.
Nihilist: My favorite of their imperial beers. Followed by the oatamis prime and the megatron.
Coconut Stout: Nice subtle coconut flavor. Smooth velvety chocolate with light roast in the background. Kinda refreshing aftertaste.

Friends sharing stouts early on in the month


Saturday, February 1, 2014

Searching for Fame and Glory – Sea Salt Caramel Stout and Stout Month 2014

I largely brew for my own enjoyment. I also just do not take the time to plan my brewing around homebrewing contests. But my wife, who is not a fan of stouts, suggested that I make a sea salt caramel stout for Stout Month this year. She even went online a looked up a couple of recipes. She is a keeper.

StoutMonth is the glorious month of February when the Mountain Sun breweries put out about a dozen taps per day of the black gold (which rotate virtually every day). Past winners have included an oaked stout and one that tastes like a Girl Scout thin mint cookie (it's good). While a sea salt caramel stout is brewed by a few places, I thought it was intriguing enough that it might have a chance. Game on.

Countdown on the window of Under the Sun
For the ingredients, I combined an errand to pick up a Bob stroller in Longmont with a chance to check out a different homebrew shop - The Bald Brewer. The guy was really cool and we had a good conversation as I went around getting my ingredients. I adapted the recipe off of one that I found on BrewToad. I picked up some caramels from King Soopers and went back home to make the starter.

The Yeast Starter – Sat. 19 Oct.

For yeast I went with the White Labs WLP 002 – Engish Ale Yeast. The flavor from this yeast turned out great, although like Engish Ale yeasts it did settle out rather quickly. If I had it to do over again I would have roused the yeast after about a week of primary fermentation. The starter followed my usual procedure of 100 g of DME boiled in a liter of water for 12 minutes.

Brew Day – Sun. 20 Oct.

I mostly followed the online recipe. I did a full wort boil (all 5 gallons) spread out over two pots that I staggered by 15 minutes. I split the specialty grains, hops, sea salt and caramel equally (roughly) between both pots. Given that a stout does not have that many hop additions this worked well and was not too much trouble.
 
Pot on the left: malt extract added, pot: steeping the specialty grains
I made a few small modifications to the recipe – I cut out about half of the lactose. I did not want a cloyingly sweet beer. I also threw in a whole oz of perle (instead of the 1/2 oz. called for) because, well, what am I going to do with an extra half ounce of hops? I put the caramels and sea salt in with about 15 minutes to go.


Fermentation started pretty quickly and went strong for about a day and a half before calming down a bit.


Bottling – Mon. 4 Nov.

I gave this one a little over two weeks – which was probably a mistake. My reasoning was that my wife was about a month out from our due date and I wanted to make sure this was bottled in time for the stout month entry date on 4 Jan.


Other logistical notes

The brew day started at 5:55 and was wrapped up by 9 pm – a little over 3 hours. Bottling took around 2 hours. The starter took around 30 minutes. Total time was around 6 hours.  Total costs were $52.78 plus probably a dollar or two for the caramels (I already had the salt). We will just call the total costs around $55. I got about 48 bottles out of the deal for a price of around $1.15 a brew.

Epilogue

The beer turned out really good. As my Boulder friends will be sad to see, it did not win – but there are some good homebrewers here, so I feel it’s like saying “I didn’t win the Bolder Boulder” – people understand that you can still have done well.


After about a month some of the bottles turned out a little overcarbonated. If I did this one again I would give it another month or so in a second carboy. I do not have precise temperature control at the house and so I think it may have just needed more fermentation time (It has been a cooler winter). It is also possible that rousing the yeast could have helped. Oh well, I may just have to brew it again.